Random Item Options
Overview
The Fractured Realms offer multiple ways of improving ingame equipment, with special consideration towards custom server equipment.
Gear Improvement Terminologies:
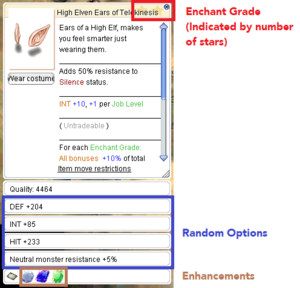
- Quality: a stat of a gear that directly affects the stat range possibilities of its Random Options. Higher quality equates to higher values of Random Options.
- Random Options: an added modification to equipments; up to 4 Random Options can be obtained for a gear.
- Enhancements: analogous to official RO's enchantment system that are situated beside the card slots, equipment enhancements are another set of modifications which can provide a mix of Attribute Stats, Offensive Stats, and Defensive Stats.
- Enchant Grade: A characteristic of the equipment; improving the enchant grade grants small defensive bonuses to armor and atk/matk bonuses to weapons and also improves other gear by applying added bonuses the item might have.
Quality
Generally, equipment that drop from monsters and enchanted chests have a certain "Quality" attached to it, primarily dictated by the monster/rift level which provided the gear. Any gear that has an associated Quality to it is said to be "Enchanted" (regardless if it actually has added mods to it), which means you can apply majority of the ingame currencies/gems to modify the gear as you see fit.
Freshly crafted official gears do not have any Quality attached to it. However, you may use Enchantment Gems or transfer the mods from another Enchanted equipment to the aforementioned gears.
Random Options
- An Enchanted item can have up to 4 random options.
- Enchanted Boxes drop items with a full set 4 options, random items have a random amount of options but always have the second modifier (stats).
- Random options can be modified using Gems/Currency.
- Charms can also have this type of modification.
- The Overall strength of the options is dependent on the Quality of the equipment.
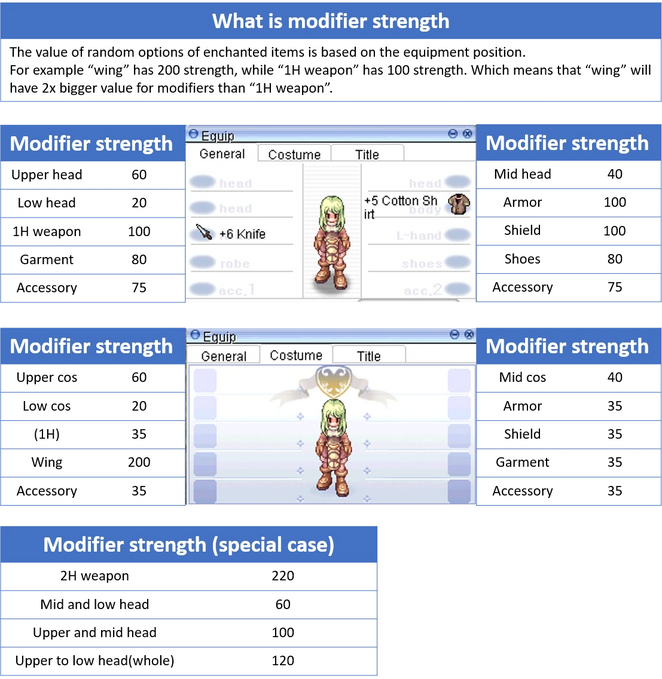
Modifier value is decided based on the modifier strength on each equipment position.
Enhancements
As mentioned earlier, gear enhancements are analogous to official RO's enchantment system (those that occupy the slots beside the cards); the only difference is how they are obtained for ROTFR custom equipment (Weapon Lv5/Armor Lv2).
- Custom craftable equipments can be enhanced thru Ryan at the east wing of the Riftbound Castle.
- The enhancements start at Lv1 but can be improved thru Ryan, albeit with decreasing chance of success.
- Enhancements require Enchanted Materials (Wood, Threads, Fabric etc) to be applied and improved.
- Fractured Coin equipments can be enhanced thru Esmerelda at the west wing of the Riftbound Castle.
- The enhancements may be Lv1 or Lv2, further improvement(s) are provided by the Enchant Grade of the gear.
- Enhancements require 5 Fractured Coins per roll.
Enchant Grade
Enchant Grade is a gear improvement system wherein higher enchant grade provides bonuses which can be specific for that gear. All equipment and charms can have Enchant Grade applied to them, Level 5 Weapons and Level 2 Armor as well as Charms and Wings can reach SS grade everything else is limited to A grade (Shadow Gear and Costume pieces).
- Enchant Grade can rise up to six levels: D, C, B, A, S, and SS.
- The enchant grade is indicated as the number of stars on the background of the item name, as well as the subscript in the inventory icon of the equipment.
- Increasing Enchant Grade is done through Alchemist Pezzletug at the east wing of the Riftbound Castle.
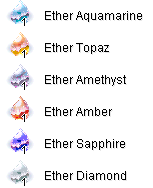
- In order to increase the Enchant Grade, Ether Gemstones are required (which can be crafted through Leiborough at the east wing).
- Success rate of improving the Enchanted Grade decreases as you go up the ranks, to as low as 50%.
ROTFR Exclusive Item Effects
- Multistrike - Increase number of hits of the skill at % chance.
- Multistrike can be stacked to 400%. Stacking multistrike will increase the number of hit from the skill.
- ex) 300% Multistrike will make the skill to hit 4 times. (original skill + 3x multistrike)
- ex) 350% Multistrike will make the skill to hit 4 or 5 times. (original skill + 3x or 4x, by 50%)
- Extra ASPD over 190 ASPD affects Multistrike, by maximum 100%. Required AGI/DEX for ASPD will be scaling with your level.
- Multistrike options from enchanted item can increase Multistrike, by maximum 300%.
- Multistrike option can be transferred to pets (including summoned monster from item such as Spirit stone, Homunculus)
- Multistrike can be stacked to 400%. Stacking multistrike will increase the number of hit from the skill.
- Spell Echo - Repeats spell at % chance.
- Spell Echo can be stacked to 400%. Stacking Spell echo will cast one more time.
- ex) 300% Spell Echo will make player to cast a spell 4 times. (original spell + 3x spell echo)
- ex) 350% Spell Echo will make player to cast a spell 4 or 5 times. (original spell + 3x or 4x, by 50%)
- AGI and DEX affects Spell Echo, by maximum 100%. The required amount of AGI and DEX is scaling with your level.
- Spell Echo options from enchanted item can increase Spell Echo, by maximum 300%.
- Ground spell such as Psychic wave, Storm gust can be stacked multiple times.
- Spell Echo can be stacked to 400%. Stacking Spell echo will cast one more time.
- Auto attack damage - massive bonuses specific to auto attacks.
- Auto attack damage option can be transferred to pets (including summoned monster from item such as Spirit stone, Homunculus)
- A select group of skills also benefit from this including the melee portion of Duple Light, Triple Attack for Monk and Star Emperors Falling Star attack.
- Double Damage - Double the total damage at % chance. The chance can be stacked and stacking over 100% does not affect anything.
- Reflect Damage - Decreases reflect damage received (includes max pain and reject sword) by % amount.
- Drain HP or SP - Drains HP or SP by the amount specified per hit at 100% chance.
- Elemental/Status resistance - resistance by % vs specified status or elements.
- Dispel Resistance - % chance to ignore dispel on yourself.
- Coma Resistance - Reduces the health lost to Coma effect, this is part of the Body Effect Resistance random option which includes Poison, Stun & Bleed but also appears by itself on some items. Having any amount of this can save you from death since instead of going to 1 HP you go to whatever your resistance is as a % of your hp (IE 10% resistance makes coma take you to 10% hp instead of 1).
- Skill Radius - Increases the radius of skills which have a skill radius assigned to them, this is limited to 7 (15x15) in total and can't increase a skills radius by more than double it's initial radius. IE a radius of 2 (5x5) can be increases to up to 4 (9x9) but a radius of 1 (3x3) can only go up to 2 (5x5).
- Faster Cooldown recovery - increase cooldown recovery speed by %.
- This DOES NOT mean that stacking the option by 100% will remove cooldown.
- The option works like "Ability Haste" from League of Legend if you played the game.
- Reduced cooldown = Original cooldown * (100/100+Faster cooldown recovery value)
- ex) 100% Faster cooldown recovery for 5s cooldown skill -> 5s * (100/(100+100)) = 2.5 second
- ex ) 400% Faster cooldown recovery for 5s cooldown skill -> 5s * (100/(100+400)) = 1 second
- It effectively allows you to cast X% more spells in the same time frame as the spell without any cooldown change.
Random Option Possibilities
WEAPON (HAND R):
- Slot 1: ATK(Flat, %), MATK(Flat, %), ATK+MATK(Flat, %)
- Slot 2: ANY STAT, ALL STATS
- Slot 3/4: HIT(Pwr27), CritAtt%, Healing%, MltStrk%, SpllEch%, HealingReceived%, DoubleD%, ASPD, CritChance%, VariableCastTime%, FixedCastTime%, AfterCastDelay, SPCost%, AutoAttDmg+%, ReflctDmg-%, DrainHP, DrainSP, Negate Elemental resistance(fire,water,wind,earth), Negate Spirit resistance(holy, dark, undead, ghost), DeflectPhysical, DeflectMagical, DeflectAll, FlatDEFPierce, FlatMDEFPierce
SHADOW WEAPON:
- Slot 1: ATK(Flat, %), MATK(Flat, %), ATK+MATK(Flat, %)
- Slot 2: ANY STAT, ALL STATS
- Slot 3/4: HIT(Pwr27), CritAtt%, Healing%, MltStrk%, SpllEch%, HealingReceived%, DoubleD%, ASPD, CritChance%, VariableCastTime%, FixedCastTime%, AfterCastDelay, SPCost%, RngDmg+%, MeleeDmg+%, MgcDmg+%, AutoAttDmg+%, ReflctDmg-%, Negate Elemental resistance(fire,water,wind,earth), Negate Spirit resistance(holy, dark, undead, ghost), DeflectPhysical, DeflectMagical, DeflectAll, FlatDEFPierce, FlatMDEFPierce
SHIELD (HAND L):
- Slot 1: ATK(Flat, %), MATK (Flat, %), ATK+MATK(Flat, %), HP%
- Slot 2: ANY STAT, ALL STATS
- Slot 3/4: HIT(Pwr27), CritAtt%, Healing%, MltStrk%, SpllEch%, HealingReceived%, DoubleD%, ASPD, CritChance%, VariableCastTime%, FixedCastTime%, AfterCastDelay, SPCost%, MeleeDmgTkn-%, RangedDmgTkn-%, AutoAttDmg+%, ReflctDmg-%, ElementalStatusEffRes-%, Negate Elemental resistance(fire,water,wind,earth), Negate Spirit resistance(holy, dark, undead, ghost), DeflectPhysical, DeflectMagical, DeflectAll, FlatDEFPierce, FlatMDEFPierce
SHADOW SHIELD:
- Slot 1: ATK(Flat, %), MATK(Flat, %), ATK+MATK(Flat, %), HP(%), DEF/MDEF, DEF, MDEF,
- Slot 2: ANY STAT, ALL STATS
- Slot 3/4: HIT(Pwr27), CritAtt%, Healing%, MltStrk%, SpllEch%, HealingReceived%, DoubleD%, ASPD, CritChance%, VariableCastTime%, FixedCastTime%, AfterCastDelay, SPCost%, MeleeDmgTkn-%, RangedDmgTkn-%, AutoAttDmg+%, ReflctDmg-%, ElementalStatusEffRes-%, Negate Elemental resistance(fire,water,wind,earth), Negate Spirit resistance(holy, dark, undead, ghost), DeflectPhysical, DeflectMagical, DeflectAll, FlatDEFPierce, FlatMDEFPierce
ARMOR:
- Slot 1: HP(Flat, %), DEF+MDEF, FLEE, DEF, MDEF,
- Slot 2: ANY STAT, ALL STATS
- Slot 3/4: MAX SP(%), HP REGEN, SP REGEN, MltStrk%, SpllEch%, -CritDmgTaken%, NeutralDmgReduction, DispelRes%, BodyStatusEffRes%,
SHADOW ARMOR:
- Slot 1: HP(Flat, %), DEF+MDEF, DEF, MDEF,
- Slot 2: ANY STAT, ALL STATS
- Slot 3/4: MAX SP(%), HP REGEN, SP REGEN, MltStrk%, SpllEch%, -CritDmgTaken%, NeutralDmgReduction, DispelRes%, BodyStatusEffRes%,
GARMENT:
- Slot 1: HP(Flat only), DEF+MDEF, FLEE, DEF, MDEF,
- Slot 2: ANY STAT, ALL STATS
- Slot 3/4: CritAtt%, MovSp%(H), MltStrk%, SpllEch%, ASPD, -CritDmgTaken%, CritChance%, PerfectDodge, NeutralDmgReduction, RngDmg+%, MeleeDmg+%, MgcDmg+%, AutoAttDmg+%, CDRedux-%, MindStatusEffRes%
COSTUME GARMENT (WINGS):
- Slot 1: ATK(Flat, %), MATK(Flat, %), ATK+MATK(Flat, %), HP(Flat, %), DEF+MDEF, FLEE, DEF, MDEF,
- Slot 2: ANY STAT, ALL STATS
- Slot 3/4: HIT(Pwr27), CritAtt%, Healing%, MovSp%, MltStrk%, SpllEch%, HealingReceived%, DoubleD%, ASPD, CritChance%, VariableCastTime%, FixedCastTime%, AfterCastDelay, PerfectDodge, RngDmg+%, MeleeDmg+%, MgcDmg+%, AutoAttDmg+%, CDRedux-%, DrainHP, DrainSP, MindStatusEffRes%, BodyStatusEffRes%, DispelRes%, ElementalStatusEffRes-%, Negate Elemental resistance(fire,water,wind,earth), Negate Spirit resistance(holy, dark, undead, ghost), DeflectPhysical, DeflectMagical, DeflectAll, FlatDEFPierce, FlatMDEFPierce
SHOES:
- Slot 1: HP(Flat only), DEF+MDEF, FLEE, DEF, MDEF,
- Slot 2: ANY STAT, ALL STATS
- Slot 3/4: CritAtt%, MovSp%(higher), ASPD, CritShield%, CritChance%, PerfectDodge, NeutralDmgReduction,
SHADOW SHOES:
- Slot 1: HP(Flat only), DEF+MDEF, FLEE, DEF, MDEF,
- Slot 2: ANY STAT, ALL STATS
- Slot 3/4: CritAtt%, MovSp%(higher), ASPD, CritShield%, CritChance%, PerfectDodge, NeutralDmgReduction,
ACCESSORY:
- Slot 1: ATK(Flat, %), MATK(Flat, %), ATK+MATK(Flat, %), HP(%), DEF/MDEF, DEF, MDEF, FLEE
- Slot 2: ANY STAT, ALL STATS
- Slot 3/4: MAX SP(%), CritAtt%, Healing%, HP REGEN, SP REGEN, MovSp%, MltStrk%, SpllEch%, HealingReceived%, DoubleD%, ASPD, CritChance%, VariableCastTime%, FixedCastTime%, AfterCastDelay, SPCost%, PerfectDodge, MeleeDmgTkn-%, RangedDmgTkn-%, RngDmg+%, MeleeDmg+%, MgcDmg+%, AutoAttDmg+%, HIT(Pwr10), ReflctDmg-%, CDRedux-%, DrainHP, DrainSP, Negate Elemental resistance(fire,water,wind,earth), Negate Spirit resistance(holy, dark, undead, ghost), DeflectPhysical, DeflectMagical, DeflectAll, FlatDEFPierce, FlatMDEFPierce
SHADOW ACCESSORY:
- Slot 1: ATK(Flat, %), MATK(Flat, %), ATK+MATK(Flat, %), HP(%), DEF/MDEF, DEF, MDEF, FLEE
- Slot 2: ANY STAT, ALL STATS
- Slot 3/4: MAX SP(%), CritAtt%, Healing%, HP REGEN, SP REGEN, MovSp%, MltStrk%, SpllEch%, HealingReceived%, DoubleD%, ASPD, CritChance%, VariableCastTime%, FixedCastTime%, AfterCastDelay, SPCost%, PerfectDodge, RngDmg+%, MeleeDmg+%, MgcDmg+%, AutoAttDmg+%, HIT(Pwr10), ReflctDmg-%, CDRedux-%, DrainHP, DrainSP, Negate Elemental resistance(fire,water,wind,earth), Negate Spirit resistance(holy, dark, undead, ghost), DeflectPhysical, DeflectMagical, DeflectAll, FlatDEFPierce, FlatMDEFPierce
CHARM(SUB OF ACC):
- Slot 1: ATK(%), MATK(%), ATK+MATK(%)
- Slot 2: ANY STAT, ALL STATS
- Slot 3/4: MAX SP(%), CritAtt%, Healing%, HP REGEN, SP REGEN, MovSp%, MltStrk%, SpllEch%, HealingReceived%, DoubleD%, ASPD, CritShield%, CritChance%, VariableCastTime%, FixedCastTime%, AfterCastDelay, SPCost%, PerfectDodge, NeutralDmgReduction, RngDmg+%, MeleeDmg+%, MgcDmg+%, AutoAttDmg+%, HIT(Pwr10), ReflctDmg-%, CDRedux-%, DrainHP, DrainSP, DmgVsSize%, MDmgVsSize%, Negate Elemental resistance(fire,water,wind,earth), Negate Spirit resistance(holy, dark, undead, ghost), DeflectPhysical, DeflectMagical, DeflectAll, FlatDEFPierce, FlatMDEFPierce
HEADGEAR:
- Slot 1: HP(Flat only), DEF+MDEF, DEF, MDEF,
- Slot 2: ANY STAT, ALL STATS
- Slot 3/4: MAX SP(%), Healing%, HP REGEN, SP REGEN, HealingReceived%, CritChance%, VariableCastTime%, FixedCastTime%, AfterCastDelay, SPCost%, NeutralDmgReduction, HIT(Pwr10), CDRedux-%, DmgVsSize%, MDmgVsSize%, MindStatusEffRes%, BodyStatusEffRes%, DispelRes%, ElementalStatusEffRes-%


